Garage Organization
- juliagoldberg10
- Apr 20, 2022
- 3 min read
Updated: Nov 3, 2025
Over Spring Break, I tackled my own garage. It's been bothering me for a while and I've tried to reorganize it several times without making much of an impact. This time, I took measurements, researched product, and created a plan and I absolutely love how it turned out,
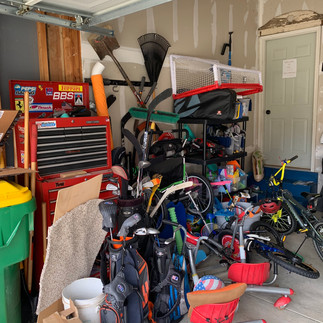
Here are the scary before photos. I hated looking at this every time I pulled into the garage and I knew it was time to implement some garage organization.
The first decision I had to make was which system to use. After doing some research, I landed on the Rubbermaid FastTrack rail system. I loved how simple it was to install. After I got the hang of it, I was able to install the rails by myself. The hooks are definitely the priciest part of the system, but many retailers offer packages that include a variety of hooks at a discount.
I chose to put all of the long hanging tools along one side of the garage and keep the floor as clear as possible so I could still access all of them while my car is parked in the garage. I love that I can hang just about anything using the variety of hooks that Rubbermaid has. And some of them are long enough, you can fit multiple tools on a single hook - like shovels and rakes. I made sure that the things I'd use the most were closest to the front of the garage where they could be easily accessed. The further back into the corner of the garage you go, are the least used items.

I applied this same principal to the shelving unit along the back of the garage wall. Put the most used items where you can easily reach them. I love the Y-Weave Room Essentials baskets that I used here. My boys chose the color and I love it.

On the other side wall of the garage, I added a hanging shelf, which leaves the floor open underneath. This shelf also attaches to a FastTrack rail across the top. This area is the toy/sports zone. Again, the blue bins make it easy for the boys to store their play items.

Closest to the entry to the house, I wanted a "drop zone" area. This rail holds our folding chairs that we can grab easily when it's time to head out for a soccer game. There was also plenty of room on this rail to hang the boys' golf bags.
I rearranged the larger items so that they would be easy to reach. I moved our adult bikes by the kids' bikes so we wouldn't have to pull my car out to get to them. And I moved the toolbox closer to the door as it was getting buried behind the riding toys, which made it difficult to get things out of.

We added a hanging shelf from the ceiling of the garage. This holds our least used bulky items.
I used some of the brackets that I already had to get the wood scraps up off the ground. They had been leaning in a corner and would always fall down and collect leaves behind them. The longer boards are up high and the shorter scraps are down low.

I debated getting rid of this storage cabinet but after I moved everything around, it still fit nicely. It had been a hodge-podge of stuff, but I added baskets and moved shelves to make it solely a gardening cabinet. Now I can find what I need!
Below are the after photos of the whole garage.


Comments